

The Document Object Model (DOM) is a crucial concept in web development, as it represents the structure of a webpage. It allows you to interact with and manipulate HTML and XML documents programmatically. Here's an introduction to the DOM with a simple example in JavaScript.
What is the DOM?
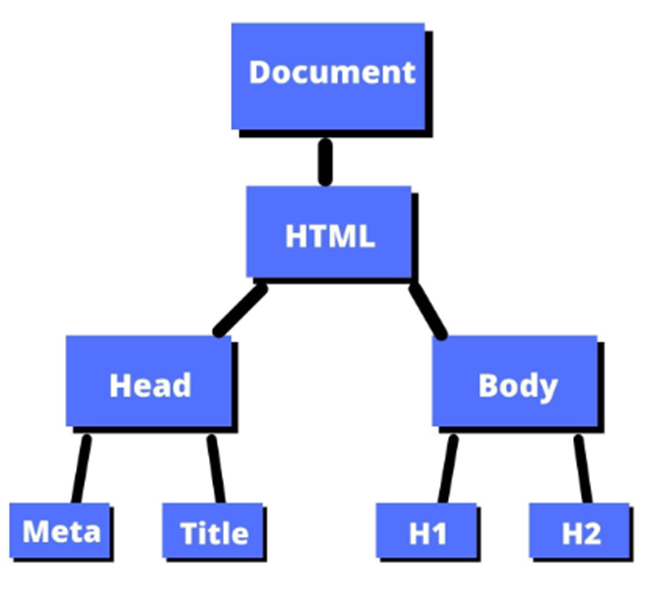
The DOM is a hierarchical representation of a webpage. It breaks down the page into a tree structure where each element, attribute, and text is a node. The DOM allows you to access and modify these nodes dynamically using JavaScript.
Key Concepts
- Document: Represents the entire web page.
- Element: Represents HTML tags like
<div>,<p>, etc. - Node: Can be an element, attribute, or text.
- Parent/Child/Sibling Relationships: Nodes have hierarchical relationships which can be navigated.
Basic Example
Let's walk through a simple example to demonstrate how to use the DOM with JavaScript.
HTML Structure
Explanation
Accessing Elements:
document.getElementById('main-heading')retrieves the element with the IDmain-heading.document.getElementById('intro')retrieves the element with the IDintro.document.getElementById('change-text-button')retrieves the button element.
Manipulating Content:
heading.textContent = 'Welcome to the DOM Tutorial!';changes the text inside the<h1>element.introParagraph.textContent = 'You are learning about the Document Object Model.';updates the text inside the<p>element.
Event Handling:
button.addEventListener('click', () => { ... });adds a click event listener to the button. When the button is clicked, the text of the heading is updated.
This example demonstrates how to interact with and modify the DOM using JavaScript, which is fundamental for creating dynamic and interactive web pages.
To execute the example of manipulating the DOM in Visual Studio Code (VS Code), you'll need to follow these steps:
1. Set Up Your Project
Create a Project Folder: Make a new folder for your project. You can name it something like
dom-example.Open VS Code: Launch VS Code and open the project folder.
2. Create Your Files
Create an HTML File:
- Right-click in the VS Code Explorer pane (or use the menu) and select
New File. - Name the file
index.html.
- Right-click in the VS Code Explorer pane (or use the menu) and select
Create a JavaScript File:
- Similarly, create another file and name it
script.js.
- Similarly, create another file and name it
3. Add Your Code
In index.html:
Add HTML code.
In script.js:
Add Script code.
4. Run Your Project
Open Live Server Extension:
- In VS Code, you can use the Live Server extension to run your HTML file.
- If you don’t have Live Server installed, you can get it from the Extensions view. Search for "Live Server" and install it.
Start Live Server:
- After installing the Live Server extension, right-click on
index.htmlin the VS Code Explorer pane. - Select
Open with Live Server. This will launch your HTML file in your default web browser and automatically reload it when you make changes.
- After installing the Live Server extension, right-click on
5. View Your Changes
- Check the Web Browser:
- You should see the heading and paragraph displayed as defined in your HTML.
- Clicking the button should change the heading text to "Text Changed!".
Troubleshooting
- No Changes Visible? Make sure you've saved both
index.htmlandscript.jsafter making changes. - Live Server Not Working? Ensure you have the extension installed and running. You might need to reload the browser or restart VS Code.
By following these steps, you should be able to see and interact with your DOM manipulation example in a browser using VS Code.


0 Comments
If you have any queries, please let me know. Thanks.