


Continuous
Integration: CI
How to build
pipeline in Azure DevOps:
There are 2
ways to create a pipeline in Azure DevOps like:
1. 1. Directly in pipeline option:

2. 2. Using Repos and set up build:

Once you
click on “Create Pipeline” button then below window will open:

Here you can use any version control which is available in the market. Since our code is in
Azure Repos then we are using first option like Azure Repos git. Once you click below
window will open.

Here MVC is our project name. Just select our project like MVC in below option-


What is
configuration?
What type of project inside in your repo like its Angular, .NET Core, ASP .NET, React etc.?
Based on project type we need to configure our pipeline for desired output.
So here we see lots of template like .NET Desktop, ASP.NET, ASP.NET Core etc. You can
choose any one of the templates. Since we are creating .NET core project framework then
we choose ASP.NET Core template.
Just click on ASP.NET Core –

Let see what
happening over here-
Azure DevOps
will create one new YAML file in our project.
What details
in this YAML file?
As per first comment it will show like it will build and test the code. The type is ASP .NET
Core. Basically, YAML is basic configuration file where we have to enter some commands
and those commands will do all the work which is required for build
pipeline.
Let see
commands one by one:
First: trigger -master = Means the
build will trigger from master branch.
Second: pool – what type of Virtual
Machine we need to build pipeline. Here we can use
Windows or Ubuntu
any VM which is available in Azure DevOps.
What is the purpose behind this- It will build the project in new VM. Once the build is
completed it
destroy the same. For that reason, here use image of VM.
Third: Variables: If you are using any variables in the code then we need to declare those
variables over here. Here “buildconfiguration” is variable and we pass the same to the next
step.
Fourth: Steps- dotnet build which build the project – the configuration will come from
variable.
Now we click
on “Save and Run” button. Below window will open:

Just click on Save and run button. Then build will completed, once it completed it will show
like:

Also, one YAML
file is created in our repo like:

Now we need
to sync server repository with local repository using git command like:
Before:

After:

Here initially we use git pull command, but it fail because our current branch is not pointing
to master branch. Then we checkout the branch like master – then check git branch for
checking current branch. Then we use git pull command for sync local repository with
server. Then .yaml file is shown in our local repo at behind in
diagram.
You can edit
this yaml file using VS.

Here
understand the pipeline details step by step.
First - prepare
job- it prepares job for build pipeline.
Second – it Initialise
the job.
Third-
checkout – get the code from repository.
Fourth:
dotnet build – it builds the dot net project.

Fifth: post job checkout- it clean and clear cache.

Then finally – finalize job and repot build status- means it send notification email for your
build to your mail id.
For e.g. We put
some error in the code then let see how its work:

Just open
the code in VS and make some changes-

Here we will
remove this bracket and commit the changes. Let see how it works.

Once you
push the command then one build triggered at server and it fail.
Then we need
to check why this build is fail let see-

Simply go the pipelines -click on failed build.

Error section showing error, but we do not understand the exact error – for more details just click on
job –

It also sends
email notification for same.
You can also download the logs for failed builds like:

Then we fix
the error in VS and again commit the changes like:

Once you push
the changes new build is running at server.
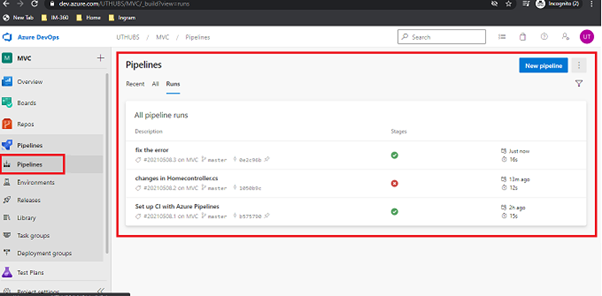
Here first
one is latest build which is success. Second was failed due to error.
Now our
build pipeline is working fine.
If you want
to change some notification setting or manage any setting, then you can simply
go to the
project setting:

Key Concept/Terms
in Azure Pipelines:
To understand
the azure pipelines, you must understand some terms like:
Agent
pool:
- When your build or deployment runs, the system begins one or more jobs. An Agent is
installable software that runs one job at a time.
- To build your code or deploy your software using Azure Pipelines, you need at least one
agent.
- In Azure DevOps we can use 2 types of agent:
1. Microsoft hosted agent
2. Self-hosted agent
Where it is in Azure DevOps:

Just go to the project setting-

When you
click on Azure Pipelines then it will show our builds like:

Here we can
see all builds are ran under this agent.
Difference
between Microsoft-hosted agent vs Self-hosted agent:
Microsoft hosted agent – this is your Azure Pipelines. With Microsoft agent pool –
maintenance and upgrade taken care for you. Each time you run a pipeline; you get fresh
virtual machine. The VM is discarded after one use. Microsoft agent run the job directly on
VM or in container.
Azure pipelines provide a pre- defined agent pool named ‘Azure Pipelines’ with Microsoft
hosted agent.
This is the simplest
way to run the jobs.
Self-hosted agents: An agent that you setup and manage on your own to run jobs – is a self-
hosted agent. This gives you more control to install dependent software needed for your
build and deployment.
Approvals:
Approval is a set of validations which are required before deployment can be performed.
Deployment
is a release pipelines which need some approval.
Example:
Getting permission from someone in a team before deployment to production.
Artifacts:
An artifact is a collection of files or packages which are created by build run. These artifacts
are available for next task i.e., deployment.
When we run the build that means we run the publish command internally then we get
some files
which is required for release or to run the particular application.
The files which we get after publishing commands or after builds those files are called
Artifacts.

The output
of any builds which is called artifact – which is used for deployment.
In short
this is published copy for deployment.
Environment:
Environment is the place where we deploy our application. It is collection of resources i.e.,
VM, container, Web App etc. The release pipeline can deploy the code on one or more
VMs (Environment) after the build pipelines
are completed.
In short it is Dev, QA, UAT, Prod etc.
Jobs:
Job represents an execution boundary of set of steps. All the steps run together on the
same
agent. One job will run on one agent at a time.
Run:
One execution of pipeline (Build or Release) is known as run. When you execute pipeline
either it is builds or release it is called run.
Stage:
A stage is used to mark separation of concerns. For Example: Dev, QA, UAT, Prod. You can
increase or decrease stage as per your need.
Steps: first
on dev->QA->UAT = if everything is ok then Prod.
Each stage contains one or more jobs. Stage is very important in adding extra validations
before your code goes to production.
Trigger:
A trigger is
setup that tells the pipelines when you run. We can configure a pipeline when-
New push in
repo, At scheduled time, Upon completion of another build.
How to
create build using classic editor:
To use classic editor just create a new project and try with that project. Here we create one
new project and set up everything. Just go to pipelines:

Here just click
on Create Pipeline button –

Just click on use the classic editor option-

Here first is your source like Azure Repos Git – Denote where is your code. Next your
Project Name –like Core-Project. Then next is your default branch like master. Click on
Continue button.

Now we need to select template from this we are using ASP.NET project then we select
ASP.NET template and click on Apply button. Depending upon your application type you
can choose your template from here.

Tasks:
Here these
are the steps available to build pipelines. First initialize the agent (Left
side).
In YAML version we need to write a code manually to publish the artifact.
Variables:

This is showing all variables. Suppose your application are using some variables then you
can define those variables over here.
Triggers:

Here is one option at right side like Enable continuous integration if check this box then
your build is automatically trigger on each check-in. You can choose then it looks like:

Options:

Here some builds related settings are provided like build description, build number format,
build job timeout etc.
Then next
option is Retention & History. History showing builds history over here.
Then simply click
on Save & Queue option like:

Once you save then below window will open:

Simply put your comment and click on Save and run button. Then build will triggered.

When you
made any changes and push those changes then build will triggered:


0 Comments
If you have any queries, please let me know. Thanks.