


Azure Repos:
Repos means repository. A repo is a container which is used to store and manage your code
in a systematic way.
Repo is a version control tool which is used to manage code.
Version
Control:
It is one
type of software which are used to track and manage each & every change in code,
done by an individual or team.
Version
control is must use software to manage your code.
Use of
Repos:
- - To
store the code of project.
- - Track
and manage each & every change in code by team.
- - Multiple
team members can work on code without any issue.
- - Can
create several copies (using branching system) to work on different task.
- - No
need to keep multiple versions for build.
Who should
use Repo:
-
Everyone
who has some data (code, file, images) related project.
-
If
an individual is working on project, then he/she also must use version control.
-
Every
team to manage their code.
-
Scrum
master or PO can use to manage their reports and documents.
Types of
Version Control in Repo:
1) 1. Git: (Distributed Version Control)
2) 2. TFVC: Team Foundation Version Control
(Centralized Version Control).
Git Vs
TFVS:
How TFVC
works:

Here,
Repository is Azure DevOps Repos. When developers are work then first, they clone the
repo in their local machine and make changes and push the same to repository.
Problem:
If both developers are work on same file and making changes in same place, when they
commit the changes then entire code will send back to repos – chances rollback someone
changes or overwrite.
How Git Works:

Distributed
means = Disconnected work system
Here,
Repository is Azure DevOps Repos. When developers are work then first, they clone the
repo in their local machine and that time one local repos are created. Any changes will
push to local repository then send from local to main sever repos.
Here you cannot depend on server repository. Simply you can make changes and push the
same to local repo and then to main server repos. Not need internet connection everything
is available in your local repos.
Common
Features:
1)
Both are used to manage
the code.
2)
Both can be used
by individual or team.
3)
Both provide
branching system.
4)
Both provide
history of changes.
5)
Both are used to
merge the code.
Which one we should use :
- Operation in Git are fast as everything happens in a distributed mode. E.g. In Git if you are switch your branches then it is easy in local repo but in TFVS the server repo moves entire code from server to local and takes some time.
- In Git, an entire replica (i.e., local repo) is available on developer machine. While in TFVC it is not available. E.g., Developers can see everything locally like branches, history of changes in TFVC not.
- Merging, Pull Request, Code Review is easy in Git.
- Git is used by most of the software development team.
- If you still have doubt in choosing them – go for Git.
You can select this version control i.e., Git or TFVC at the time of project creation. Like

To work with
Git just open the below site on your browser for downloading the software.

As per your Operating System you can choose your version. i.e., Windows. Just download
Simply open
command prompt and type Git command -> Press Enter

Its showing
above details means git installed properly.
If you want
to find the version of your Git, then type the below command:

If you want to find out how many commands are work under the Git, then type below command:

Clone Azure DevOps Repo:

How to add code under repo. There are multiple ways to clone the repo to your local system like:
1. 1. Git command: Here we need to just copy
the first URL from Azure DevOps like:

Come to your
local folder like in D: drive I have created one folder like DevOps_Pratice
Just select the top folder and write cmd and enter

Here that folder path is coming in cmd just type command like git clone and paste the first copied URL and press enter. If you first time clone this then it prompts to enter User-id or password.

Here we do not have any code or file for that reason its showing above message. But when you check your folder then one project and git folder is created under project folder. Git folder is hidden then enable the hidden option from folder for visibility.

1. 2. Through Visual Studio: Just open the VS2019
-> Click on Clone a repository option.

Right now,
we don’t have any code then go with continue without code-> option – click on
it
Go to the
Team Explorer and choose the Open Git Changes option.

Once click
new window will open:


Here, enter the
URL of repository and path – click on clone button.

Once you
click 2 folders are created under target directory:

1. 3. Tortoise git: For using this option
first we need to install this software in your local machine through below
link:
Just go to the Download Option and choose the setup as per you need:

Once you
install the Tortoise git then under right click some options are available like:

Git clone Git Create repository here and tortoise git these 3 options are coming. If you want to clone the
repo through tortoise git then simply click on git clone
->

Here just
copy the URL and directory which you want to clone.
What is the meaning
of cloning?
We are creating
the connection in between Azure DevOps Repository and our local system.
If make any changes in our local folder i.e., Create, delete, modify etc. then we sync those
changes from our local system to azure dev ops repository. Here we learn how we can
clone the
particular repository from azure dev-ops to our local system.
Git
Commit, Push, Pull Azure Repo:
Here we learn how to push our local code to Azure DevOps repository. For doing this first
we need to create the project.

Here, we are creating one new .NET project like just open the command prompt
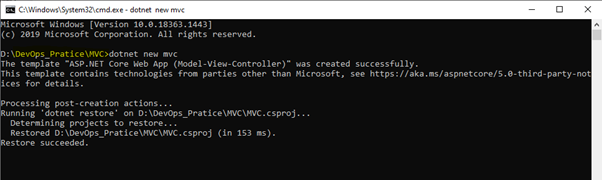
Here we enter one command like dot net new MVC and press enter. Go to our folder – one
MVC project is created.

These are the new files so first we need to tell git about these new files. How to add these
files into git

Here we need to enter one command like “git add –all” and press enter. Here we just
adding those files and not commit anything. It just affects only on local repository not on
server.
Now we
commit those changes:
Commit?
Its basically one object which has some information about particular change. A commit has
one unique id, has message what changes we are making in change, information about all
files where we are making those changes. How to make commit just simply type command
like “git commit -m “created a new dot net project”” with meaning full message and enter
like :

Here we are using ‘-m’ for message means what change we made. Now our local repository
is up to date, but our server repository is still not sync. We need to sync both repositories
together.
How: There are 2 ways to sync both repositories 1st we can get code from server repository
to our local repository. 2nd we can send our local changes
to the server repository.
To send all
changes from local to server we use “git push” command.

Just enter
your credentials – then it is showing below message.

Now just refresh our server repository then it sync’s with local repository.

Here we can learn how to clone repository from local to server. Suppose there are multiple
developers one can clone from local to server. Now another developer wants to clone
server copy into their local machine then how we can do? We can do the same by using
commit pull command.
Simple go to another folder like

open cmd and enter “git pull” command and enter

Here all process is completed, and all files are sync from server repository to local
repository. i.e., second developer sync all files from server to their local machine
(repository).
Suppose one developer change something in their local machine i.e., add one file in their
project then how we can push those change from local to server using git, tortoise git &
Visual Studio :

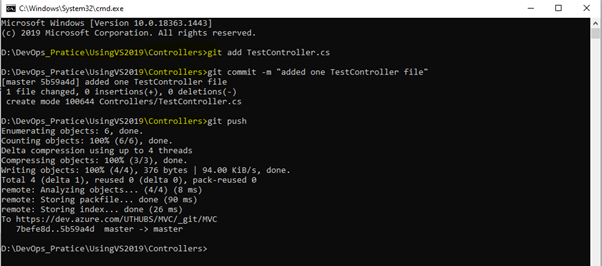
Here we can add one controller under controller folder like TestController.cs. We are not
writing anything in this controller just testing purpose we created blank.
Now we need
to tell local repository like we add one file in system.
Git approach:
If we are using git command approach, then we need to remember all git commands like:
git add,
commit, push etc.
Here we need to choose the complete folder path where our new file is existing and use all
commands line by line. Once push is done the new file is moved to server repository like:

Tortoise git Approach:
Just right click in that local repo folder – tortoise git - add


Its showing
new added file – click ok.
Now we need to commit those changes. Again, just right click – Git commit-> master


Then choose commit & push option from commit dropdown. This option also pushes these
changes from local to server repository. Now second developer does not sync with these
changes, so we need to pull those changes from server to their local repository for this –
just right click – pull – click ok.


Visual Studio Approach:
Now we learn how to commit & push your changes from local
to server repository using VS.
Just open your local project in VS-2019 like right click in
that folder and open it into VS2019

Now its showing in VS2019 like:

Here we change something in TestController.cs file and commit and push the same into the
server.

Here we add some code in TestController.cs file and choose the second option like commit
staged and push option. Then these changes move to server repository. Just refresh it look
like:

You see the history
of each commit like :

Each commit
has unique id.
Working directly on Azure DevOps server repository:
For this just open your project and go to the Repos services - > Right side our code will
show like:

Here we just try to add one folder with one file then how we can do this – just go to the
right side 3 dots & create one folder and add one file like:

Just add folder name and file name and press add button. Once you add then file will be
showing your left side like:

Our first step is completed like add the new file and now we need to commit those
changes. For this just click on Commit button at right top and commit those changes like:

Once you click on commit button then one commit id is created like:

If you want to edit in this file, then simply click on Edit button and code in that file and
commit those changes by clicking Commit button like:

You can
change in any file directly on server and commit also.
Now its time
to sync our server repository to local repository. How we can do this:
Simply go to your local folder and open the cmd and type the “git pull command” and
enter. Before git pull command, my folder look like:

Now just open
cmd and type git command like:

After git pull new folder is sync with local repo:

Also, you
can download the entire repository using download zip option like:

You can add, edit, delete the file on server repository.


0 Comments
If you have any queries, please let me know. Thanks.